This guide takes you to a tour of reset network settings windows 10. Let’s get started.
Window 10 Anniversary Update introduces a new feature of resetting network settings on Window 10. Window 10 has a command line utility that is known as Netsh.
Netsh is also called the Network Shell of the system. With the help of Netsh, you can see and change the settings of the network configuration of your computer system.
The Netsh is basically used to reset the settings of TCP/IP protocol and TCP/IP (Transmission Control Protocol/Internet Protocol) goes back to its default settings.
The need for a reset network is to solve the network issues. When the process of reset network begins, then it will clear all network devices of your computer system.
Must Read : How To Fix High RAM and CPU Usage of Windows 10 System
After this, it will reboot your system and clean your all drivers and your network settings are set to the default settings.
So you are not able to connect to the internet. There are many ways to reset network settings windows 10 that are mentioned below.
How to Reset Network Settings Windows 10
#1. Method 1
You can reset the network settings Windows 10 by using Settings App of Window 10. It contains some steps that are discussed below: –
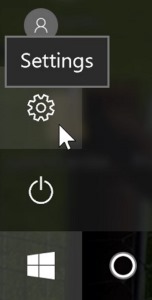
Step 1: – Firstly, open the “Window Settings” directly or by shortcut keyboard keys. Press the keyboard keys of “Windows + I” to open the window settings. You can also open the Window Settings from the Start button.
Click on the Start button and then click on the Cog Icon that is placed on the left side of the screen.
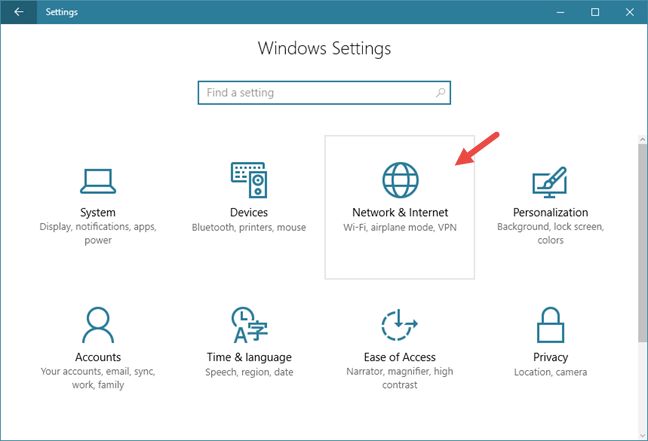
Step 2: – Then, a new window pops up on your screen. From it, select the option of “Network & Internet”.
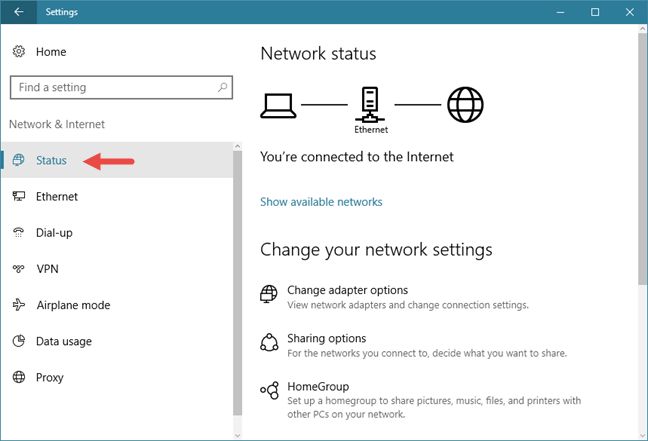
Step 3: – When you click on this option “Network & Internet” then a window pop up on your screen and shows all network settings of your Window 10. In this, select the option of “Status” from the column that is placed on the left side of the screen.
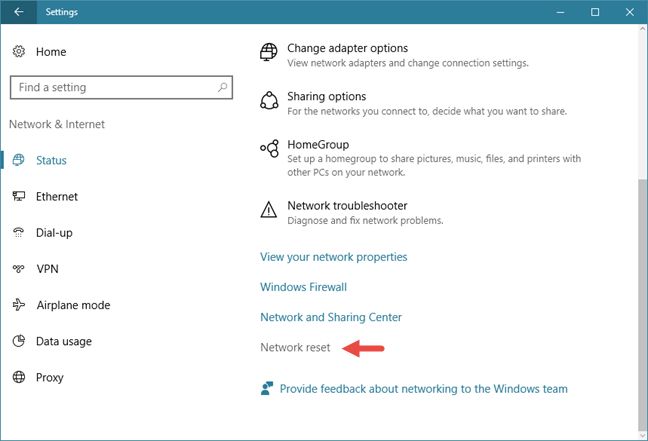
Step 4: – After clicking on “Status”, it shows some settings. So you will scroll down the screen and select the link of “Network Reset” and click on it.
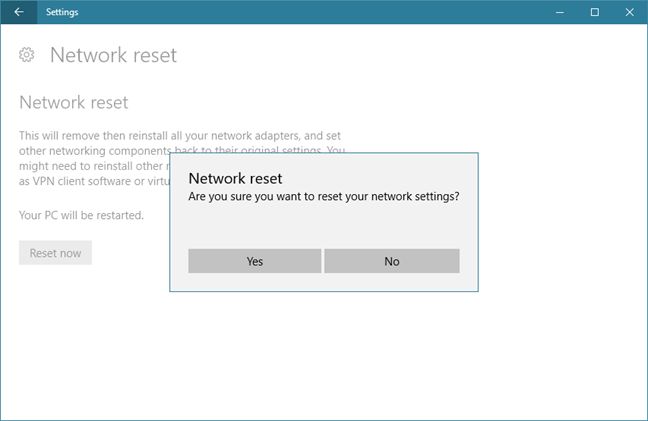
Step 5: – Now, it will show the window screen of “Network Reset”. This option will erase all the network settings. After this, it will reinstall the network adapters and set the other components of the networking to its default settings.
You can also reinstall networking software like virtual switches or VPN client software. Then select the option of “Reset Now”

Step 6: – Then, a new dialogue box will pop up on your screen. It will ask you about confirmation that you want to reset the network adapters. Then, you will click on “Yes”
Step 7: – Finally, a new dialogue box will open on your screen and shows the message “Windows will shut down in 5 minutes”.
So if you are doing something then saves it before restarting the system. You can also manually reboot your system.

- Step 8: – After restarting your system, your network settings will reset and you will again reconfigure your network settings.
#2. Method 2
You can also reset the network settings by using troubleshooting on Windows 10. It includes various steps that are the following: –
Step 1: – Firstly, press the Keys “Win + R” on the keyboard of your computer system. It opens the Run window on your screen

Step 2: – Then, type the code “ ncpa.cpl” into the Open text field and click on the “OK”
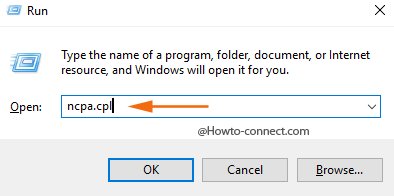
Step 3: – It will pop up a dialogue box on your window screen that is “Network Connections”.
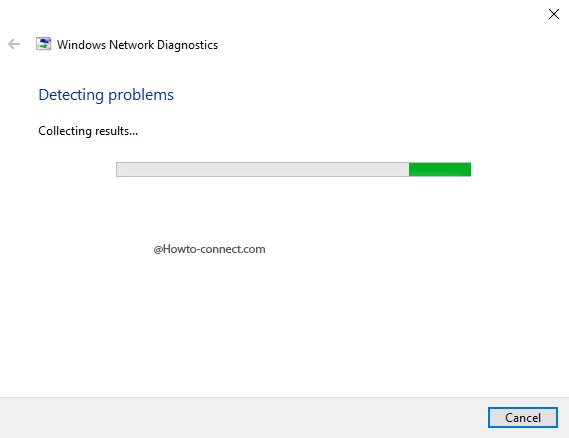
In this, you will have to do right click on the “Wi-Fi” and it shows a list. From the list, you will select the option “Diagnose”.

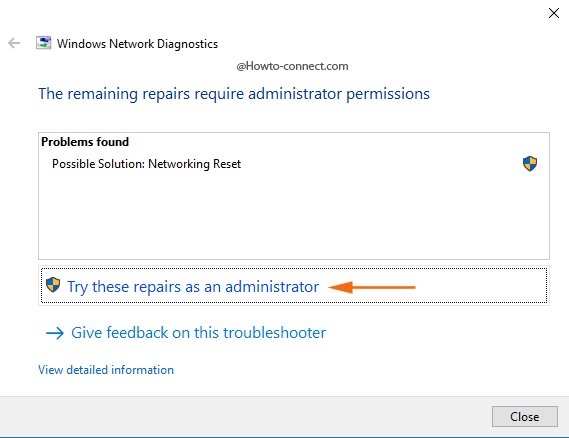
Step 4: – Now, it will detect problems of the network in the “Windows Network Diagnostics” dialogue box. It will show all the faults on your screen.
Step 5: – After the completion of scanning, it will show the result under Problems found “Possible Solution: Networking Reset”.
Then you will click on the option of “Try these repairs as an administrator”.
Step 6: – Finally, you will restart your system.
#3. Method 3
You can also modify the network settings via Command Prompt. It has following steps: –
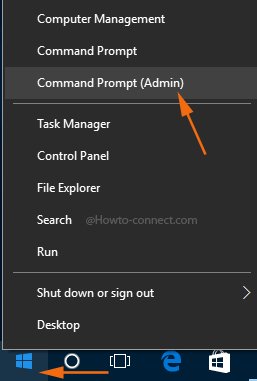
Step 1: – Firstly, right click on the symbol of “Windows”. Then it will pop up a list. From it, select the option of “Command Prompt (Admin).
Step 2: – Then, it will open the command prompt on your system. after this, type the code netsh winsock reset and press enter.
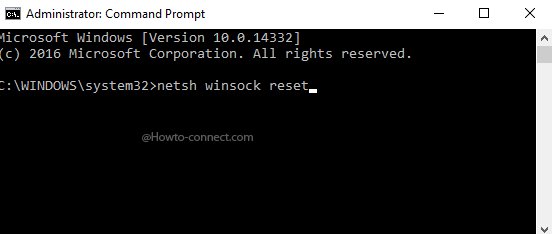
Step 3: – The command prompt will run this code and after some time, it will display the message on it “Winsock reset completed successfully”.
Step 4: – Finally, reboot your system to perform the network modifications on your system.
So, this was our guide regarding reset network settings windows 10. Please let us know in comments your views or any doubts.
